ZerOBNL
ZerOBNL is a co-simulation platform.
Documentation
What is co-simulation ?
Co-simulation can be defined as the coupling of simulation tools (also referred to as simulators) for assessing a partitioned complex system. The idea is to partition a system into sub-systems, modelling each of them separately with a specific simulator and to re-create the global behaviour of the complete system by exchanging data between the models of the sub-systems at simulation runtime. Within this context, a co-simulation tool or platform is the software synchronizing execution and data exchange of the individual simulators coupled within a co-simulation. The platform can also help to create co-simulation models and to deploy simulators.
ZerOBNL features
ZerOBNL is made for:
- Distributed simulation (on a real cluster or just connecting two computers)
- Cross-platform simulation (Linux, Windows and/or MacOS in the same simulation)
- Simplified deployment process (based on Docker containers)
ZerOBNL can not be used:
- To brew coffee
- To model sub-systems
- As a database (see our article for that)
How does ZerOBNL work ?
We recommend to use Jupyter Notebook to interact with ZerOBNL.
Jupyter is a web-application for interactive computing. It allows to combine live code, visualisations (images, diagrams and results) and narrative text. Such features make it a valuable trade-off between graphical and pure code based interfaces bringing together the ease of use and the high versatility of a programming language. This application enables the creation of rich and interactive outputs and easily shareable notebooks (and display via GitHub/GitLab).
Jupyter is fully free and open source, heavily modular and customizable, and based on open standards. It provides a simplified access to the general purpose and well documented Python (and other various programming languages) ecosystem for data mining and management, plotting, etc.
Such features make Jupyter a good choice to configure co-simulation and analyse results in the same environment of development.
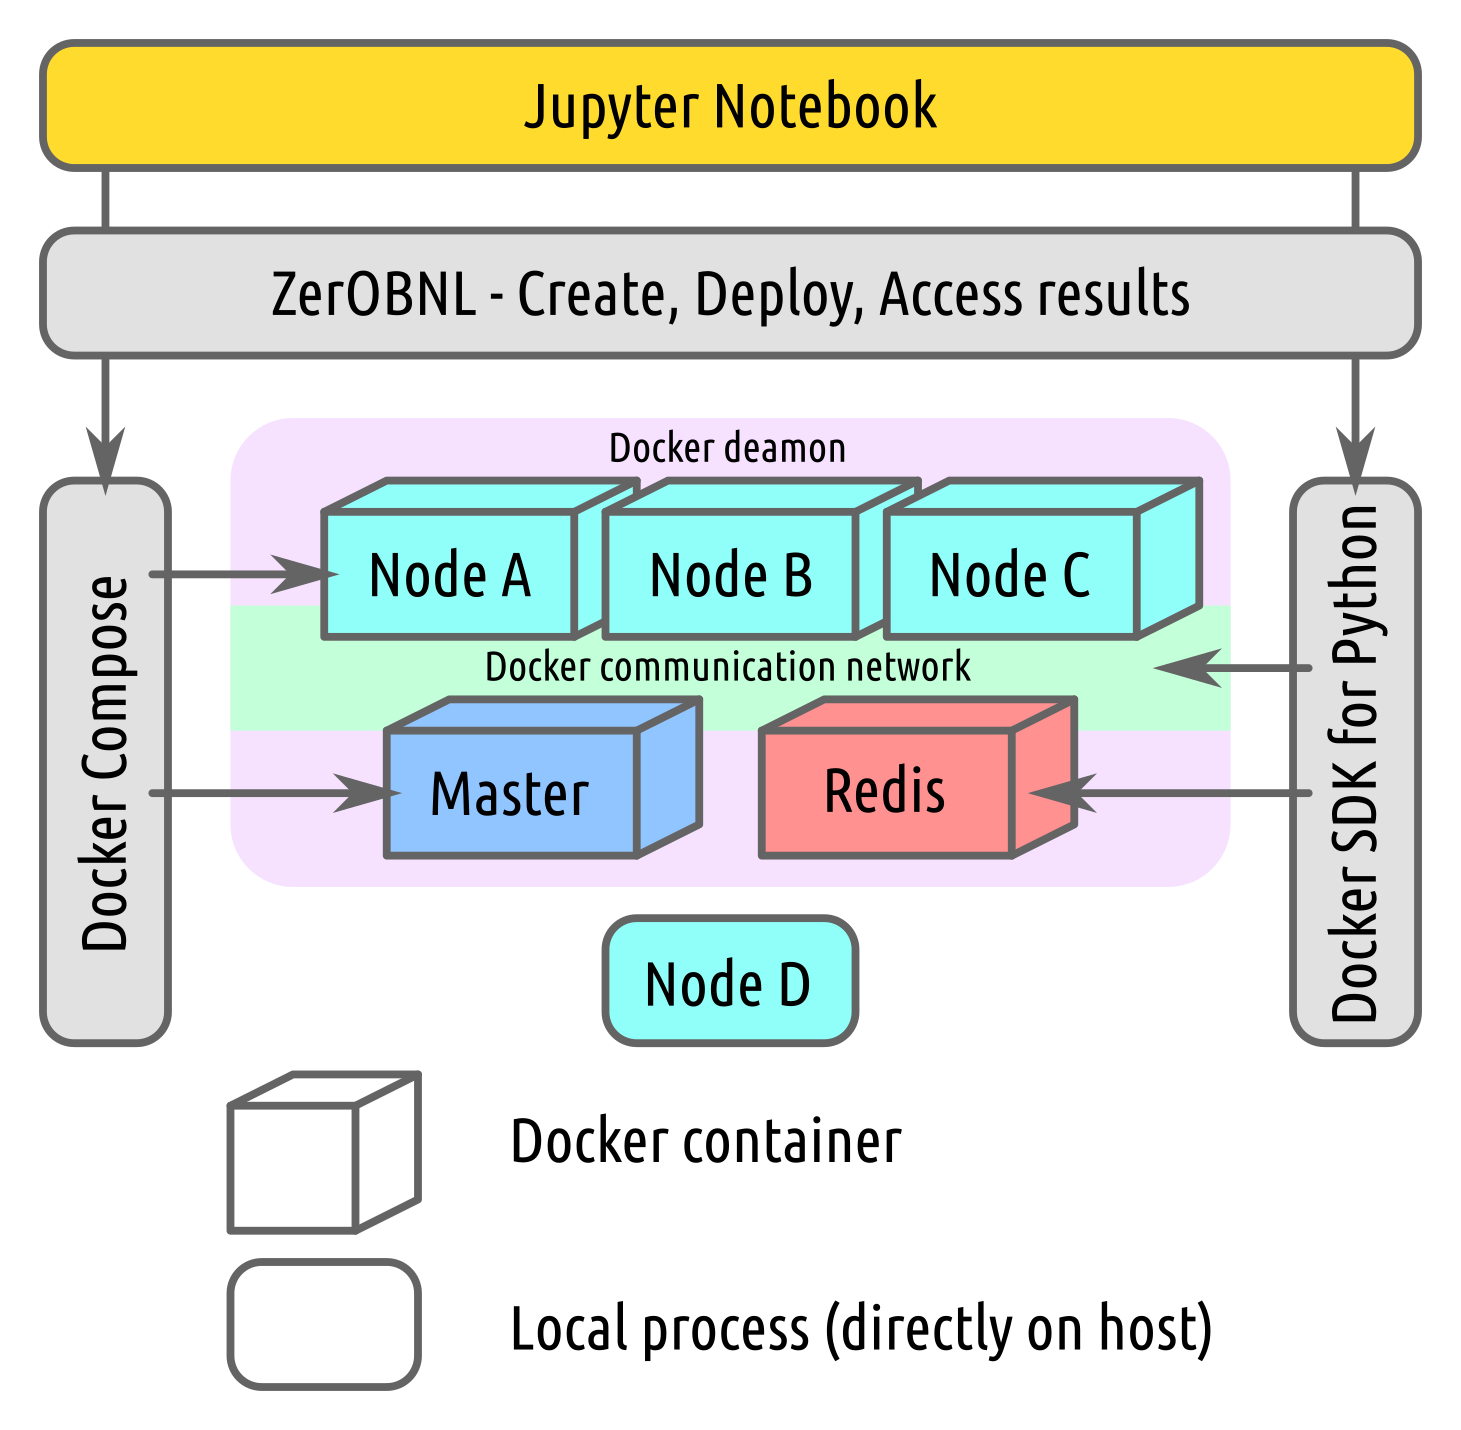
ZerOBNL relies on Docker to create dedicated and isolated containers that packages up code and dependencies for each model of sub-systems and allows to run it quickly and reliably from one computing environment to another. Docker provides a simple way to allow communication between containers by creating networks.
The simulation is orchestrated by a Master process (also running inside a Docker container). The communication between the Master process and models is done using ZeroMQ, following a communication process described below.
ZeroMQ looks like an embeddable networking library but acts like a concurrency framework. It gives you sockets that carry atomic messages across various transports like in-process, inter-process, TCP, and multicast.
During the simulation, the exchanged data and the internal state of sub-systems models are stored into a results database. This database is hosted on a Redis container.
Redis is an open source (BSD licensed), in-memory data structure store, used as a database, cache and message broker.

The communication between the Master and the Nodes goes through two different channels. The Master can publish messages and broadcast them to a group or to all the Nodes via a publish/subscribe pattern. The Nodes can then respond to the message by sending a response message to a first-in-first-out queue via a push/pull pattern. The Master knows how many Nodes need to respond so as soon as every needed Node sends back a message it can start the next simulation process.
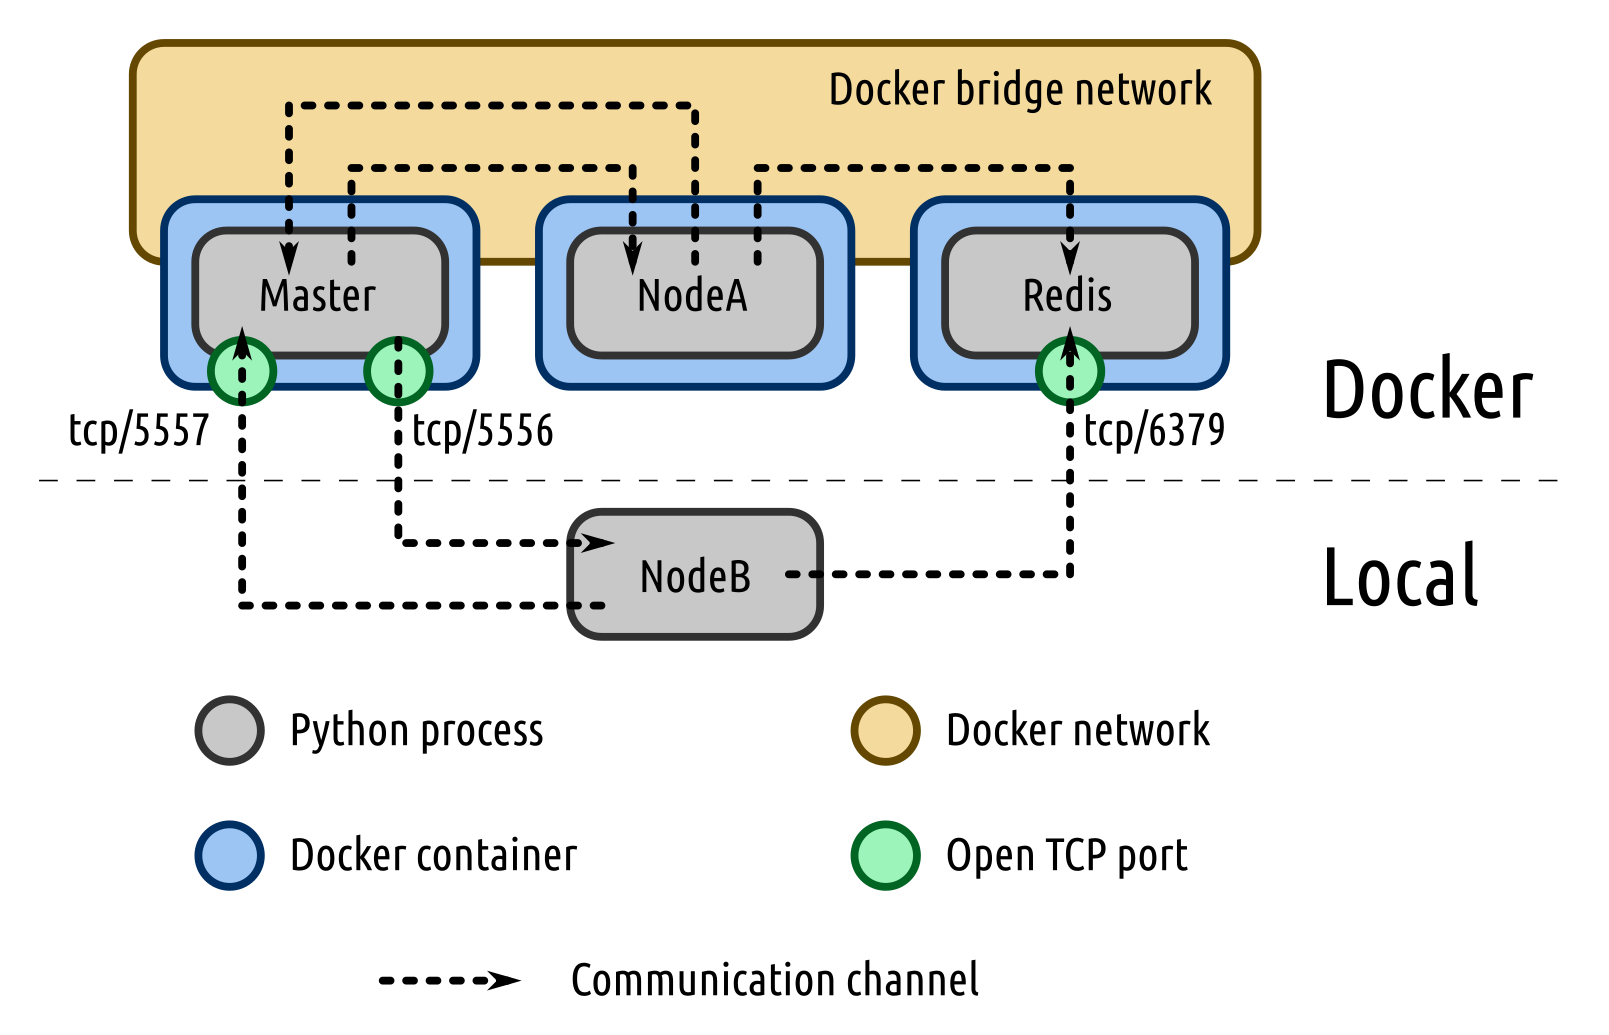
It is also possible to run Nodes directly on the host, without using Docker. In order to allow that, two ports are made accessible for the Master: 5556 and 5557 by default, corresponding respectively to the publish/subscribe and the push/pull communication patterns. The default port for Redis (6379) is also open so a Node running locally can send values to the results database, see minimal local example.
How to model complex systems with ZerOBNL ?
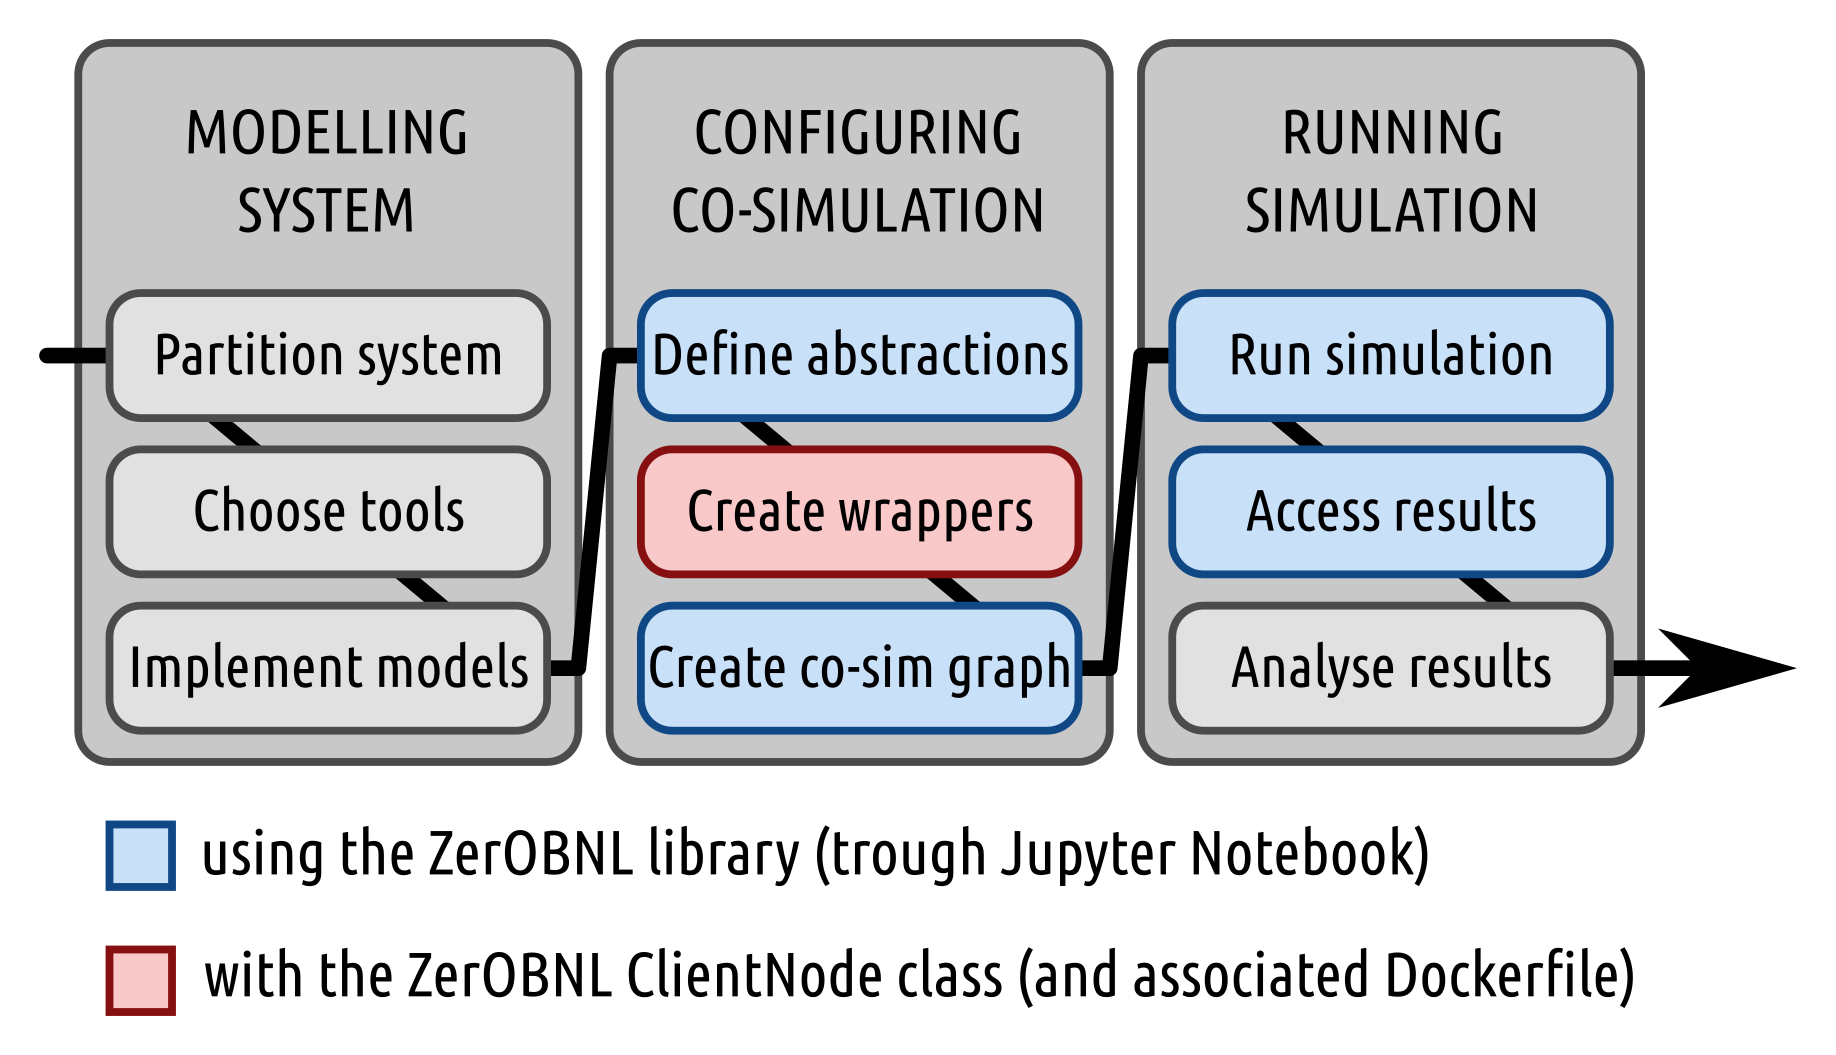
1. Partition system
This is the core part of large scale multi-domain co-simulation, defining how you will cut your large system into smaller ones and how the information will flow between the sub-systems. Examples:
- do you put a heat pump and its associated controller in the same sub-system or in two different ones ?
- do you want to transfer mass flow [kg/s] and temperature [°C] or only a thermal power [kW] ?
- what is the more adapted communication step size between the sub-systems ?
2. Choose simulation tools
In order to be used in a co-simulation a simulation tool must be able to communicate with an external process, so it is possible to get a value, set a value and make a simulation step.
Some standards already exists like Functional Mock-up Interface to facilitate data exchanged between models.
Functional Mock-up Interface (FMI) is a tool independent standard to support both model exchange and co-simulation of dynamic models using a combination of xml-files and compiled C-code.
3. Implement models
ZerOBNL only helps to connect tools together, it’s your job to create models needed for your simulation. They need to allow for 3 features:
- set attribute
- get attribute
- make a step (fixed or variable time step)
4. Define abstractions
This is when you need to define the conceptual co-simulation model by creating Meta-models, Environments and Nodes.
A Meta-model defines the inputs and the outputs, more precisely attributes to set in the model and attributes to get from the model. It describes the way the model of a sub-system will interact with other models of other sub-systems. In order to maintain consistency between exchanged data, you also need to define the unit of the attribute, so you do note connect [kW] to [m3/s].
On the following example the Meta-Model Meta has an input a defined as a binary and two outputs b and c defined respectively as [m3/s] and [kW].
from zerobnl import CoSim
sim = CoSim()
sim.create_meta_model("Meta", [("a", "binary")], [("b", "m3/s"), ("c", "kW")])
An Environment characterizes the simulation settings needed by a model to run. It defines the dependencies (see Dockerfile) of the simulation tool, how the model will communicate with the orchestration process (see Wrapper)
from zerobnl import CoSim
sim = CoSim()
sim.create_environment("Env", "wrappers/my_wrapper.py", "dockerfiles/MyDockerfile")
A Node is a running instance of a model of a sub-system. You can define:
- initial values that will be set to attributes of the model
- parameters that can be used by the wrapper
- files to add to the dedicated container
- and define if the Node will run locally or in a container, by setting local to true.
sim.add_node("Node", "Meta", "Env", init_values={"d": 0.5}, parameters={"data_file": "mydata.csv"}, files=["data/mydata.csv"], local=True)
5. Create wrappers
Wrappers are the connector between simulation tools and the rest of the co-simulation framework. Using the ZerOBNL ClientNode python class, the python process running a wrapper will, during the simulation, be used as middle agent between the orchestration process and the simulation model, passing messages and data back and forth.
You can use the wrapper of the provided minimal example as a template and build your own wrappers from there onwards.
6. Create co-simulation graph
The co-simulation models and results are closely related to how you decide to partition your system. This is where you actually connect the sub-systems together and define the exchanged data using Links. A Link connect an output attribute from a Node. to an input attribute to an other Node.
The following example connects the output attribute sink_flow of NodeA to the input attribute srce_flow of NodeB.
sim.add_link("NodeA", "sink_flow", "NodeB", "srce_flow")
7. Run simulation
- Define simulation sequence
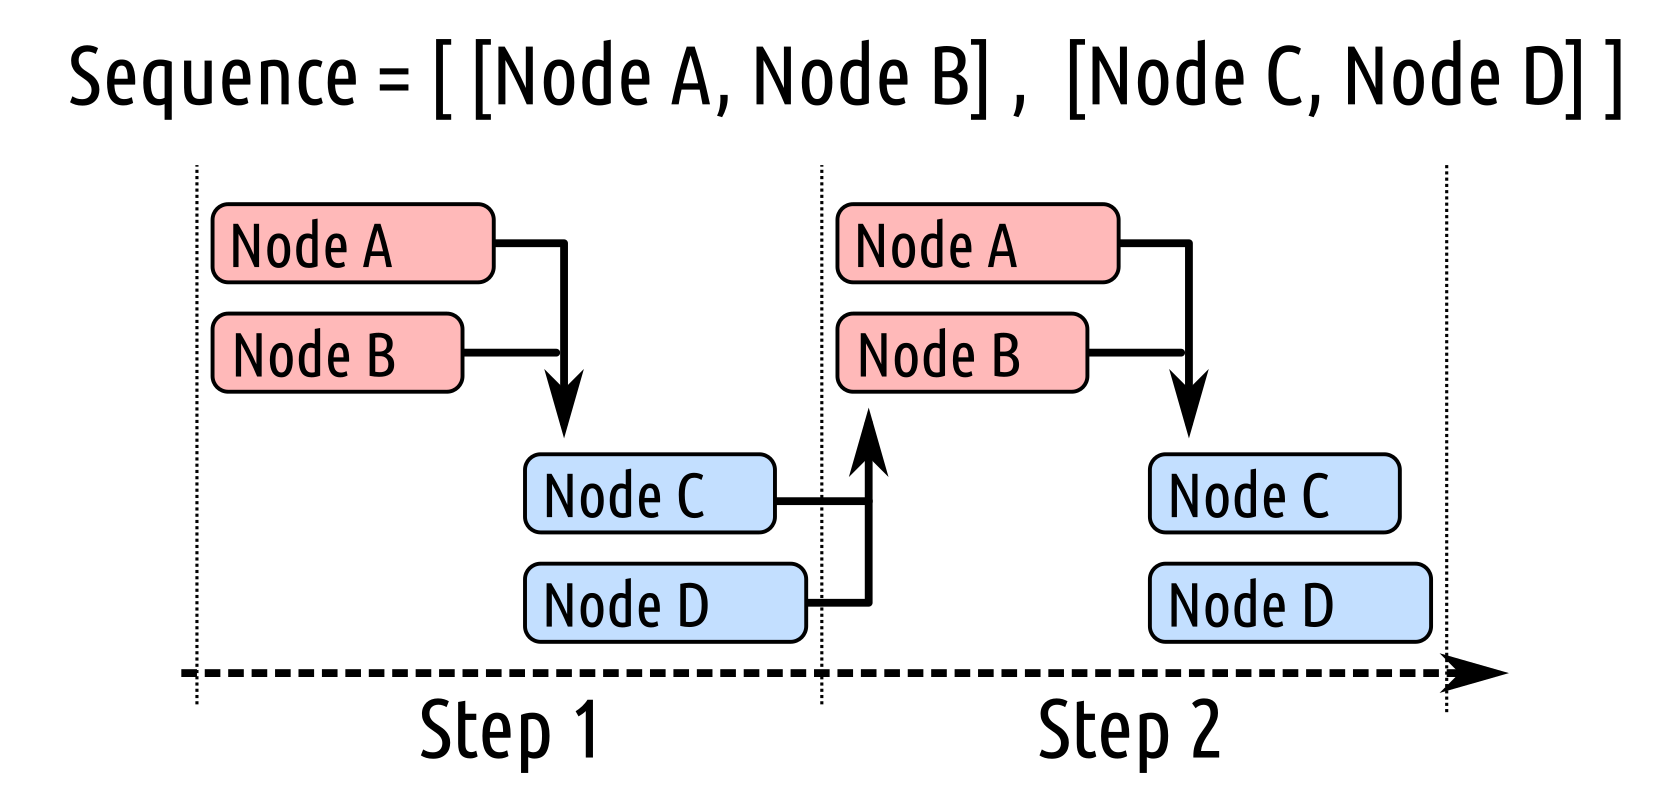
The following example defines two groups of Nodes to be run sequentially as shown above. NodeA and NodeB will make a step in parallel, and when both are done NodeC and NodeD will also make a step in parallel.
sim.create_sequence([["NodeA", "NodeB"], ["NodeC", "NodeD"]])
Nodes sharing a direct Link cannot be in the same group and run in parallel.
- Create simulation steps
sim.set_time_unit("minutes")
sim.create_steps([10]*60*5)  # This will create 5*60=300 steps of 10 defined time unit (minutes)
Once everything is ready, you need then to run the simulation and go take a coffee. Depending on how you defined your sub-systems, the number of them, the communication step size you choose and the available computation power, it can take some time !
8. Access results
During simulation, results and variables of the different sub-systems are stored onto a Redis database, ZerOBNL gives you some functionalities to collect and export them.
sim.connect_to_results_db()
sim.get_list_of_available_results()
res = sim.get_results_by_pattern("OUT*Base0*")
9. Analyse results
You can then continue to analyse the results in Jupyter or export them. Since you are working with Python you can directly use matplotlib and/or seaborn to visualise results and Pandas to post-process and export them.
Glossary
-
Docker can build images automatically by reading the instructions from a Dockerfile. A Dockerfile is a text document that contains all the commands a user could call on the command line to assemble an image. You can refer to the Dockerfile best practices for a tip-oriented guide and use this file as template.
-
A wrapper function is a subroutine whose main purpose is to call another subroutine or a system call with little or no additional computational overhead. Wrapper functions are used to make writing computer programs easier by abstracting away the details of a subroutine’s underlying implementation. In the case of ZerOBNL wrappers are used to interface between the co-simulation master and the simulators.
-
The connection between the inputs and outputs of the individual nodes in a co-simulation can be represented in a co-simulation graph. Each node of the graph represents a co-simulation nodes, and each edge of the node represents a connection between an input and an output variable.